A ‘woody’, at least in the jargon we use in this strange vintage audio hobby/compulsion/ affliction, is a piece of audio equipment either encased in a wood (or pseudo-wood) case or having wooden panels as part of the case. My Pioneer TX-7800 is of the latter persuasion, although the ‘veneer’ here is actually vinyl, and not heavy-duty vinyl either. Here’s the before picture:
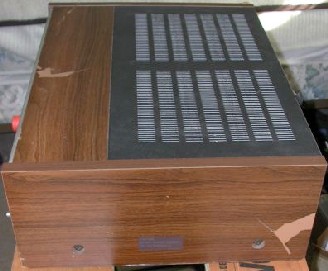
Photo #1 – Before
Do It Yourselfers( DIY) – By and for the Marginally Competent. This collumn is not intended to educate experienced audio Do-It-Yourselfers. If you are one of those, feel free to read on and send critical letters to the editor. (Just be aware that, for some editors, any feedback is good feedback.) The intent is to help make the use of vintage (i.e. affordable) equipment more practical for the ‘common man’.
All of the functions work in this tuner, it pulls in stations well, and is the pleasantest sounding of the several tuners that share my home. So… it seems reasonable to spend a little money, time and effort to get it looking more respectable.
Getting it together
The first thing to be done is gathering the necessary materials. I live in a small town well out in the sticks, so the easiest way to do the gathering is via the Internet. During my daily visits to the Audio Karma board I learned about a product called ‘peel & stick’ veneer; real wood veneer sliced very thin and with the adhesive already on it. The poster wrote that he had good results with it. My self-awarded title of ‘marginally competent’ doesn’t apply to veneering, so I went for that. Some posters recommended the use of a hand operated veneer saw. There were also references to an ‘Exacto’ knife, but I decided to go with one of those utility knives where you break off a piece of the blade when it dulls and feed out a fresh edge. Those are available locally, as is duct tape.
And away we go
Four screws, two on each side, hold the case to the chassis. With those removed, I turned the case over.
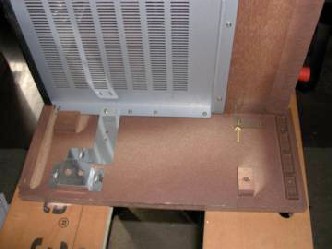
Photo #2 – the underside
Aha! Seven little woodscrews holding the side panel to the top; well, not quite so removing them only revealed that there’s some pretty powerful glue involved in the holding. After a little ‘strength testing’, I decided to leave those pieces joined; screws reinstalled. Removing the vinyl turned out to be easy on the wide surfaces, because the stuff was really thin and not very strongly stuck to the substrate (just like to throw in a fancy word now and then). I was able to get one side off more or less intact, so it could be used as a pattern for locating the holes for the mounting screws. I just had to remember that the holes aren’t located the same distance from front and back, meaning that one of the transfers had to be on the back side of the veneer piece.

Photo #3 – the easy part
Getting the vinyl off the edge sides of the panels was not easy. It was a lot thicker there, either because there was no substrate or because it insisted on coming off with the vinyl. Photo #4 shows the longest piece that came off at once; the rest was pretty much a nibble at a time.

Photo #4 – the hard part
OK. The vinyl is off, now I have to prepare the surfaces for the veneer. I used an orbital finish sander for this, which I suspect would/will cause frowns and maybe other expressions of disgust from any really competent ‘veneerers’ reading this; sorry. That very smooth substrate on the wide sides looked a little too smooth to me (probably wrong again), so I ran the sander on those surfaces too. Now it’s time to cut some veneer. This Peel & Stick veneer comes in a roll. The supplier recommends unrolling the sheet on a flat surface and holding it down for some hours until it has relaxed the springiness that being rolled up gave it; less chance of it ‘springing’ away from the panel later.
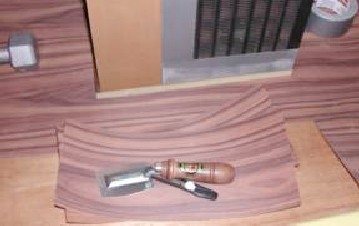
Photo #5 – veneer for the side panels
I used the case to guide the cuts for the side panels. It turned out that the veneer saw isn’t necessary for this Peel and Stick veneer; the utility knife gets through it in three passes or so. When this stuff is described as ‘thin’, they mean it. The instructions that came with it say that the wood is 1/64th to 1/75th of an inch thick. The top panel and the narrow pieces I measured, and used a straight-edge (yardstick) to lay out on the veneer sheet. I also used the yardstick as a guide when cutting the veneer. A wooden yardstick doesn’t work perfectly for this – I kept getting shavings off it with the knife. The instructions say to allow an extra 1/8th inch or so for each dimension, to be trimmed off after the veneer is in place; that worked out fine, with one exception – where I done wrong.

Photo #6 – the marginal part of “marginally competent”
The lighter colored line where the top panel meets the side panel is where the trim cut wanders a little. I should have used a straight edge to guide that cut too. Oh well, maybe next time. Good thing I’m not going this job for a paying customer. The case is ready for finishing now; unfortunately the weather isn’t. I don’t want to use tung oil or linseed oil, because they require a lot of rubbing and I have arthritic elbows. That leaves polyurethane, which I have used before and like. The problem is that polyurethane gives off noxious fumes until it’s dry, so I need ventilation. The temperature outside is in the low 30s Fahrenheit, so I won’t be opening any windows soon. Can’t do the job outside because the stuff would take approximately forever to dry. So…
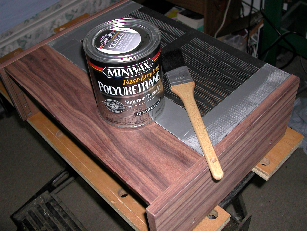
Photo #7 – almost finished – waiting for spring
If both of us are still around then, you’ll see a photo of the glorious finished case I’ve slipped into that month’s column – the editor probably won’t notice. I do believe I’ll take the duct tape off now, though; that stuff tends to shed adhesive if left on too long. My intentions for next month’s column involve replacing flimsy ‘spring clamp’ speaker output terminals on an amp with so-called ‘five-way binding posts’ (haven’t figured out what the 5 ways are), and replacing the power cord. The connector change seems to be universally approved of, but the details of the power cord replacement are contentious. I have done some research and arrived at an appropriate marginally competent conclusion.
Check back. Bob
![]() from affordableaudio
from affordableaudio
Hi,
Just wondering where you got your stick-n-peel from?
Looking for a good source!