Introduction:
Anyone who frequents audio forums knows they are bound to find a cable debate of some sort at any given time. For me, I can only try to ignore what people say about specific cables and try them for myself, provided they are in my budget. Having used Viper cables and KnuKonceptz cables with much success,I decided it was time to try something new for my 2-channel system that I was building for dedicated music listening. My goal was to keep the entire rig under $1,200,so that didn’t budget much for cables. I ended up seeing these cables posted on the Polk Audio forums by Zingo himself, and decided that at the price of $85 for the 5 foot pair,they were going to be the cables for my rig.
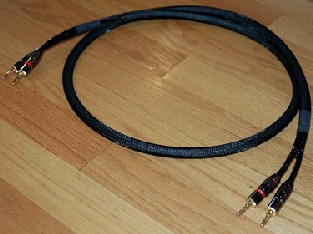
A week after I placed my order with Jake Montzingo, the cables arrived from Washington, priority mail. My first thought was wow, extremely fast turnaround for custom cables. Upon opening the box, I saw they were packaged nicely and after a quick comparison, that they were exactly the same length, not even half an inch off, no wrinkles in the heat shrink, they had nice tight connectors on the ends, and the black-on-black really looked nice.
Specifications:
- Core: Canare Star Quad 4S11 11awg Copper
- Connectors: GLS Audio Banana
- Length: 5 feet
- Misc: Techflex, Heatshrink, Cable Pants
- Price: $85/pair
The 2-Channel System:
- Jolida 502B with modified subwoofer pre-out
- NHT Model 1C Bookshelf Speakers (new replacement Vifa woofers)
- Harman Kardon FL 8450 CDP (in the rig, not currently connected)
- DLO HomeDeluxe Ipod Dock w/Remote
- Belkin PureAV PF30 Power Conditioner
- Dell 17” LCD Monitor
- Paradigm Speaker Stands (sand filled)
- Salamander Arche?type 5.0 Rack
- Zingo Speaker Cables
- KnuKonceptz eKs Silver Interconnects
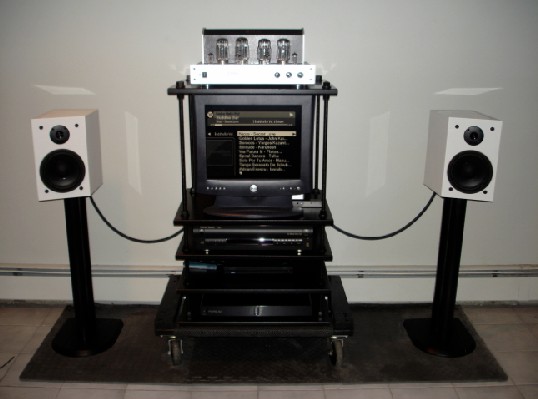
There are just a couple things to note when looking at this system. All of the music is in Apple Lossless format. The current iPod is a 4 gig Mini; this, however, will have been replaced by a 160 gig iPod classic by the time you read this article. Currently, I am using my Logitech Harmony 880 from my home theater set up with an extra activity for this system to control the dock, rather than using the remote that came with the dock. Immediately, the furniture dolly under the rack stands out to most people and I get ridiculed for using it. However, I live in a basement apartment that has flooded a couple times before (cannot go higher than a couple inches), so I figured better safe than sorry, and painted the dolly, added, an antiskid mat to it, and put the rack on it. Now, in the event of a potential catastrophe, I can get the system out of harm’s way immediately. Last, all the cables are kept apart from each other, power cables down the middle, interconnects up the right side, and speaker cables to the back and away from anything else.
The Comparison – Zingo Cables vs. Homemade Monster Cables
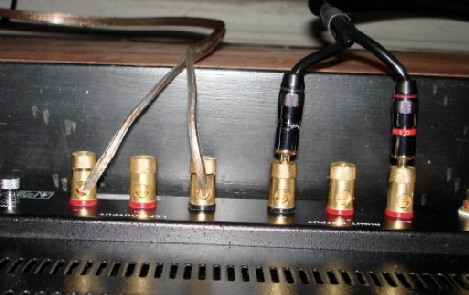
The closest I ever had to a second music rig was my testing rig, which used the above homemade 16awg Monster Cables (6 foot pair) with some cheap banana jacks soldered onto the ends of the cables. I never really thought much about the cables and once I began to assemble my 2-channel system I just used these Monster Cables. As you can see from the pictures, both the + and – on the Monster cable look identical, other than some small writing on the cable, the bananas look same, and I ended up having to attach electrical tape to both ends to remember which line was negative. My first impressionwith the 2 channel rig was -how good it sounded, but part of me thought that was only because of the amplifier and speakers I chose, and not the cables. After a week of listening, I felt that since everything else was on the nicer end, it was time to take the bottleneck Monster Cables and replace them.

Time for the Zingo Cables. Hookup was easy: the bananas clearly identified the + and -. No more electrical tape flags! After installing the Zingo Cables, in order to satisfy those who believe in cable burn?, I put my iPod on shuffle and let the music play for almost two days(~40 hours). When it was time to begin my A/B testing, I unhooked the left channel Zingo cable and reconnected the homemade Monster Cables:
The first music I decided to listen to was disc 2 of The Eagles: Long Road Out of Eden. My first impression during the first song Long Road Out of Eden was that the Monster Cable left channel sounded great. I thought to myself, this is so much better than listening to music on my home theater, it cannot get much better. Then, however, I switched over to the right channel, using the Zingo Cable on the same song, and was blown away by the change in vocals and instruments. At first I thought I had something hooked up wrong with the Monster Cables. I paused the music and double-checked the Monster Cable connections to make sure something wasn’t loose, or there weren’t any wires touchingother wires. Everything was fine. I went back to the Zingo Cable side and pressed play again to finish listening to the track. The Zingo Cables gave the music more depth and presence through my NHT 1C bookshelf speakers. It was such an audible difference I instantly turned into a believer that cables do make a difference.
The next bit of music I decided to give a try was Live: Mental Jewelry. Same as the previous test, I decided to listen to the first half of the song using the Monster Cables and the second half of the song with the Zingo Cables. It was in the first song, Pain Lives on the Riverside that the audible difference? between the two cables was incredible. I could easily hear sounds using the Zingo Cables that were definitely not audible using the Monster Cables. This trend continued through the rest of the CD.
In conclusion, I removed the Monster Cable channel completely and replaced that cable with the other Zingo Cable. I listened to the tracks I had previously -A/B’d ,-and confirmed my initial impressions with the Zingo Cables. It was as if the music had suddenly come alive and really put the stage right in front of me. I had no desire at this point to leave my listening chair; I justcontinued to go through the music on my iPod. To those who say music on an iPod cannot sound good no matter what you do to it, I have determined otherwise, and have decided to leave this rig as a dedicated iPod rig for the time being.
Pros:
- Price
- Quality
- Customization
- Fast Turnaround
Cons:
- Not so much a con, but if your amplifier has 4 ohm and 8 ohm outputs like my Jolida, be sure to specify when you order to make sure you ask for the cable pants to be on the longer side to ensure they fit without issue.
- The connectors are screw down connectors and are not soldered. For me this was not an issue, since I do not change speakers and amplifiers the way some do. Although I like to assume people remove connectors by grabbing the connector itself, and don’t pull connectors by pulling from the wire itself, I am sure some do, and having screw-down terminals could potentially cause them to come loose if enough-force is exerted.
Final Comments
I couldn’t be happier with my purchase. The fit and quality of these cables is better than any other cables that I own, and for the price of $85-a pair, they just cannot be beat. The difference they made in my rig created an immediate believer out of me in regards to the cable debate. I encourage anyone looking for cables on a budget to contact Jake Montzingo directly through his website (listed at the beginning of this review). Or you can find him frequenting the Polk Audio(www.polkaudio.com/forums) forums Should I need to switch to a bi-wire configuration, I wouldn’t hesitate to order another pair.
from affordableaudio, By Mark Pelletier