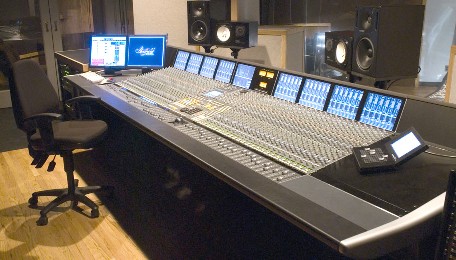
In this article I am going to discuss that piece of equipment which is probably most iconic of a recording studio, the mixer desk. At first a large mixer desk can seem quite daunting having so many controls. I have been asked before ‘do you really know what every one of those controls does?’ This can seem quite impressive to the average non-technical person, but it is not nearly as complex as it seems.
The mixer desk is mainly comprised of many repetitions of the same sets controls, called channel strips. Beginning at the top of the desk where the input connection is made, to the bottom where the level fader resides, is a straight line of controls one after the other, and this is also generally how the signal flows. At least, this is the case in an analog mixing desk, and while they are becoming less common, it is still this formula that digital desks use for the flow of processes applied to the signal. I will go through these controls now in order of the signal flow.
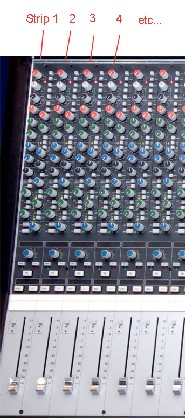
At the top of the channel strip is the Gain pot (pot is short for potentiometer, aka control knob) this sets the amount of (pre)amplification that is applied to the incoming signal before it is sent around the rest of the desk. This is very important because all electronics have an optimum operating level, above the noise floor and below the overload point. The gain should be set such that the peak of the incoming signal is a small amount below the overload point giving the best signal to noise ratio.
Next in the signal flow is usually an insert connector, usually a TRS jack socket that is physically located on the back of the desk. This is a connection where the signal flow can be broken after the gain control, sent to an external device for processing, and then sent back to the mixer desk to carry on its journey. Equipment such as compressors, noise gates, distortion effects for guitars and any equipment that processes the signal in its raw form would be inserted in the chain here.

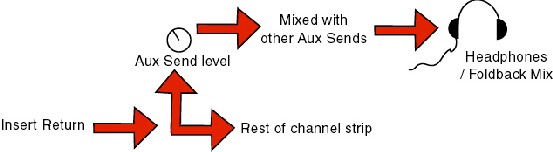
Following the insert connection point usually comes an aux send control. This feeds a copy of the signal, which is summed with the aux send of each channel strip (this summation of signals is called a bus) to a singular output for connection to external devices. This is different from an insert point because the final output is a summation of the aux send of each channel. It also has two settings called pre-fade and post-fade, that set whether the signal is taken from after the main fader, or if the level is independently controlled by the aux send pot near the top of each channel strip. Looking now at the pre-fade setting, this allows a separate mix to be created and sent from the aux send outputs, which is ideal for giving a dedicated mix to the performer in the studio live room. The performer usually wants to hear something different to that of the engineer in the control room. In actual fact there are a number of these aux send ‘bus” so that each performer can have their own dedicated mix to listen to.
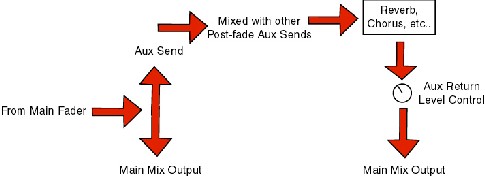
The post-fade aux send is a little more complex to get your head around. It is usually used in conjunction with the aux return, that has its own level control dictating how much is added back in to the mix. So in this case, the signal routed the aux send output is controlled by the main fader rather than its own control knob, and the signal chain is not broken, as it is with the insert connection described above. The output is externally processed, and then returned via the level controlled aux return. In fact a separate channel strip can be used for the duty of aux return if desired. This may all sound a little complex, but the key to understanding is that the post-fade aux send and return is used for effects that sound different depending on the level of the signal. Take for example reverb, which sounds different when the singer is faded down to a quiet level than it does if the singer is loud during an intense chorus. So, the level of signal sent to the reverb processor has to reflect the position of the main fader, and the aux return control then sets the final amount of that reverb signal to be mixed in with the final production. If the pre-fade aux send was used, the reverb would stay at a consistent level interdependently controlled from the main fader – no good at all!
After a bank of four or so aux sends comes the EQ section of the channel strip. I’ve already gone in to the detail of EQ in a previous article so I’m not going to spend much time here. It is nearly always a parametric EQ, with a separate EQ for treble, mid and bass, and in digital desks is usually fully adjustable in all areas .
In most large mixing desks used in the studio environment now follows the first ‘small’ fader or a control pot, sometimes called the recording fader. This controls the level of an output that is on every channel strip, and is the signal level sent to the multi-track tape recorder. Similar to an aux send, but each channel has a separate output for the recorder.
Next comes the pan or balance control, and under that the main ‘large’ fader of that strip. The pan control as you already know, places the signal in the stereo soundstage. The large fader adjusts the signal coming back from the tape machine because of course, getting the best sounding mix for listening to is a separate job to that of getting the best level to tape. The output of each of these ‘large’ faders sums to the main stereo mix-down bus. That is, the main mix.
There is naturally also a ‘tape monitor’ button, which sets whether the engineer is listening to the signals going to tape from the ‘small’ faders, or if they are monitoring the signals coming back from the tape-returns via the large faders main mix.

Thus far I have been describing the desk in its roll for recording a live performance to tape, and monitoring it in the studio. However, the desk also has the roll of mixing what comes back from tape for the final mix-down, which is not usually done at the same time as the recording process. To do this, the Mixdown button is used to switch the mixers inputs from the live microphones and instruments, to the output of the tape recorder. In this mode, the outputs from the tape can be processed and mixed again to get the very best result for the final production.
Most desks have groups. Each channels output can be assigned to one or more groups, and then these groups individually mixed. For example, if a drum kit was recored with 7 mics, the mix of those 7 mics could be routed to a single stereo group, and then the drum kit level adjusted as a whole, and recorded to tape as a simple stereo track. The same can be done at mix-down if multiple channels from the tape need to be adjusted as one.
Each channel also has a solo and mute button, which are pretty self explanatory. The solo button allows monitoring of only that channel, and the mute button mutes that channel.
Previous issues in this serie:
 Recording Process Part One: “Live” Room
It recently struck me that in this hobby of ours, there is often talk of all manner of things that have their affect on the sound of music; from speakers and amplification to the mood you were in when…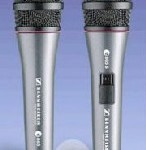 Recording Process Part Two: Recording Techniques, Microphones
Last issue we covered the main types of recording environments, so I guess the next logical thing to discuss is microphones. There are a few different technologies in current use which each having the…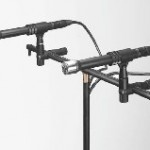 Recording Process Part Three – Microphones, Techniques & Technology
The last article went in to detail about different microphone types and their polar patterns . I didn’t explain how the different polar patterns are achieved though, and I think it is quite a smart bit of engineering, so lets look at that. Recording Process Part Four – Microphones, Techniques & Technology
Along with the advent of multi-track recording (an idea conceived by Les Paul and put to practice originally by Ampex), new microphone techniques were also developed to record each instrument individu… Recording Process Part Five – Monitoring, Techniques & Technology
In these articles we have covered a little bit about acoustics, the technology of microphones and microphone techniques. Today we can look at monitoring, mainly in the studio but also for live perform… Recording Techniques: Studio Sound Effects
Hi, guys and gals. Sorry I missed the last two issues. Work has kept me rather busy of late. But now I’m back with a new article about a number of common effects used in the studio, and how they work…. Recording Techniques: MIDI
The studio technology I’m going to discuss this issue is something called MIDI, which stands for Musical Instrument Digital Interface. If you are keen on computers you may have heard of MIDI as a file…