
It seems as if I have been interested in music, and the equipment that reproduces it, for as long as I can remember. It’s all the fault of the good people who produced the Radio Shack catalogs of the mid 1970’s. Fast-forwarding to today…audio, especially vintage and DIY audio, has become a borderline obsession. Still, I know nothing really explains why I bought a pair of fifty-year old 400 lb. speakers, sound unheard, and flew them across the Atlantic to New England. It’s funny; you know it never occurred to me not to.
Which brings me to my current project, the restoration of a pair of LSU/10 BBC Studio Monitors made in the early 1950’s by Parmeko of Leicester, UK. You would be forgiven for not knowing much about these speakers as they are quite rare. They were built in the days before the BBC licensed speaker manufacturers to sell copies of their designs. Being prohibited from selling the LSU/10 to the general public, the BBC was Parmeko’s only customer.
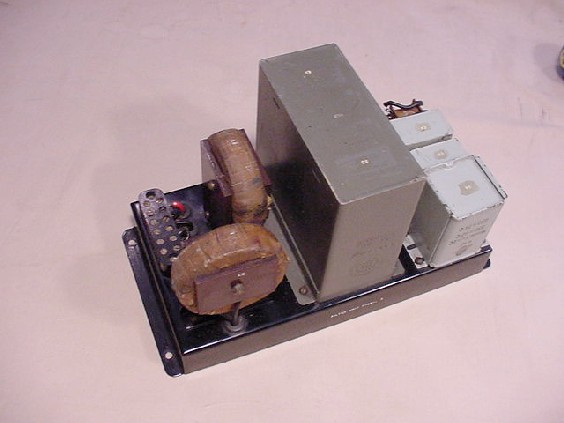
The LSU/10 was designed in the late 1940’s by D. E. L. Shorter, who was chief engineer at the BBC and one of the greatest minds ever to work in audio. It was innovative being the first speaker to be designed with cabinet resonances in mind. The inside is fully lined with varieties of thick wool padding. The cabinets are an aperiodic vent design built by Lockwood. There is a compartment in the bottom right side of the cabinet, which originally housed a specially modified Leak TL/12.1 power amplifier. I have managed to acquire one of these amps and I am patiently waiting for a second one.
It is estimated there were less than 1000 LSU/10’s made in the early 1950’s. They came in three finishes. Judging by the old BBC studio pictures I have seen, oak veneer seems to be the most common. Basic black and BBC hammertone gray rounded out the selections. Quite a few of them were still in service in the early 1980’s at the BBC. I only know of one other LSU/10 in a private collection and the owner has been looking for ten years for a second one.*
The “pair” I have were saved from destruction by a Studio Manager at the BBC in 1982. They were stored by him until 2002 when they were bought by a music producer in the UK. The speakers went unused by the producer until I bought them in February of this year.
The word pair is in quotation marks because being manufactured in the age of mono meant that there was one speaker per studio and consequently no matched pairs. In fact D.E.L. Shorter believed it wasn’t possible at the time to make perfectly matched stereo drivers using paper pulp cones. The advent of stereo brought with it Bextrene and other plastics used in the manufacture of speaker cones.
I really appreciate the patina old things acquire through years by careful handling and use. I feel it is usually best to keep things as original as possible, especially something rare. That being said, these speakers didn’t arrive with the warm glow of a hand rubbed oil finish layered with fifty years of lovingly applied polish. No, they showed up in two totally different finishes. Considering how esthetically challenged the LSU/10’s were even when new, if they ever stood a chance to get in my living room something drastic had to be done cosmetically. The first major hurdle was deciding on what to do about their appearance. I had one speaker painted hammertone gray and one veneered English Oak. I must admit I really dislike Oak. The thought of going through the expense and effort to veneer the gray speaker in Oak didn’t thrill me any more than ending up with a pair of Oak speakers did. Not to mention that both speakers have had a hard life and the one that was currently oak would need a lot of restoration to stay that way.
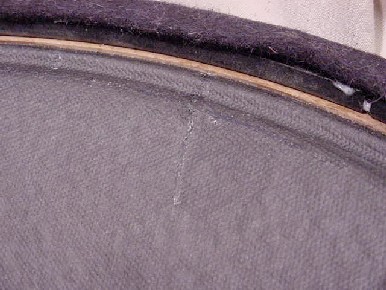
My choice, finally, was to finish them both in the original gray hammertone paint. Knowing the cabinets came from an industrial setting the restoration process began with a thorough inspection. I removed the drivers and the crossovers. I knew the components all worked so I would deal with them later.
The glue used to assemble the cabinets had not been enough to keep all the joints of the amp shelves intact. I started by re-gluing and clamping all the problem areas. While the glue was drying I used auto body filler to fill the numerous surface dents and dings. After the glue was dried the cabinets were back to solid as a rock. It took two coats of body filler to fill all the voids. Sanding the body filler is pretty easy, I used 100 grit followed by 220. With a normal painted finish I would go to a little finer grit next but since my finish was going to be hammertone there would be no need to have it any smoother.
Hammertone is a thick durable paint finish that has a “fish eye” appearance; it is seldom seen anymore but was very popular on electronics in the early days. The brand name is Hammerite. The BBC used it so frequently it is often referred to as BBC gray. Applying this type of paint to small areas with a brush is a breeze. Applying it with a roller on large speakers is a nightmare. Hammerite needs to be recoated within 30 minutes or it can’t be recoated for two weeks. Using a roller left lines in the finish that would not go away no matter what I tried. With two weeks to wait before I could apply a second coat, I would use the time to inspect the components.
The LSU/10 uses the Parmeko built LS-1 driver designed by D.E.L. Shorter. The LS-1 is a dual concentric consisting of a 15” straight sided cone woofer with a 3” voice coil, and an aluminum dome, multi cell, horn tweeter.
The LS-1’s resemblance to the earlier Altec 604 cannot be denied. The first LS-1 driver was excellent in all regards. The second one had a soft cone. My disappointment was only slightly tempered by the fact that I had listened to the speakers prior to disassembly so I knew they sounded pretty good just as they were. When tapped the bad cone made a dull thud instead of a crisp snap the way it should have. The paper had lost its integrity. Normally when this happened the driver is either reconed or discarded. Neither choice was an option in this case. Fortunately the driver was designed to be in pro service and therefore, was easily re-coned. I started taking the driver apart to remove the cone. The tar filled tweeter horn was removed first by removing the four screws holding it in place. The outer rim of the cone is held in place by sixteen small bolts that go through the frame. The phenolytic type spider is held in place by three bolts. The cone was surprisingly easy to remove. During the disassembly process I noticed another problem due to the paper’s loss of integrity. The position of the voice coil in the gap was much higher than the other driver. The voice coil was almost half way out of the magnet gap. The surround, although intact, was nearly useless when it came to doing its job of returning the cone to its original position.
I have repaired my share of drivers in the past but this was going to be a challenge. I did a quick search of the internet to no avail. If someone else had tried to restore a driver this badly damaged, they hadn’t left a trail. My first step was to clean the cone front and back. A long time ago a friend in the antiques business told me they cleaned mounted birds by rubbing fresh white bread on the feathers. The bread crumbles away as you rub taking the dirt with it. I have since heard bread is also used to clean oil paintings. With nothing to lose I bought a loaf of bread and proceeded to clean the cone to a point that actually surprised me. Fifty years in a silk bag didn’t prevent all dirt from getting on the cone. The cones dull dark gray color quickly gave way to a much darker almost black shade. It was now much closer to the original color. Pleased with my initial progress I forged ahead.
Aileen’s tact glue is a great product to fix torn speaker cones. It is clear when dried and stays supple. I have used Aileen’s in the past mostly to fix those tiny stress cracks that almost all paper edged drivers eventually get with great results. The surrounds had remained flexible. I diluted some glue with water until it was the consistency of light cream. The paper edge I was dealing with was basically an inverted half round. In order to restore it I used a piece of 16 gauge insulated wire which nearly perfectly filled in the half round. Inverting the cone on a flat surface with the wire in place, I weighed down the edges and the center of the cone so the wire made the cone edge form a perfect half roll. Just what I hoped would happen. After the half roll edge was treated on the back of the cone with two coats of very thin glue and allowing ample drying time in between, I took the weights off and was very pleased with the result. The half roll was now holding the proper shape. Two coats of glue on the front of the surround made the edge very stable. It was time to try it on the whole cone. Two coats of diluted glue with ample drying time in between on both sides of the cone produced a final result that was better than expected. It was not perfect but it was excellent. The feel of the cone had gone from a one to a six plus on the 1-10 scale.
I reassembled the driver and gave it a listen, much better. It only lacked the bass snap the other driver had. I could live with this. Fortunately I didn’t have to. A popular auction web site had a listing for a LSM/8 BBC specification Leak TL/12.1 amplifier. The listing mentioned the amp had come from a LSU/10 speaker. I emailed the seller in the UK to find that although the cabinet had been destroyed he still had the LS-1 driver.

During testing the seller found no continuity in the woofer voice coil and a small tear in the cone. This was another disappointment. The aperiodotic cabinet was famous for eating woofers when driven hard. It had probably claimed this one too. I insisted on buying it anyway. The auction ended and I wanted the Leak amplifier more than anyone else so I was the high bidder. I had a courier pick up the LSM/8 amplifier and the LS-1 driver from the seller and ship them to me. Two days later I went to Logan airport in Boston to pick them up. As I was now an expert in disassembling the LS-1, the cone was quickly removed and some testing found not just one break in the voice coil but two. The breaks were in a good spot. They were each in one of the leads that were glued to the side of the cone. If I could fix them there should be no lasting effects. The problem was the voice coil wire was aluminum. I don’t have the ability to solder aluminum and the breaks were in a place that made soldering impractical. During inspection I noticed that Parmeko had used a small coil of wire to attach the aluminum wire to the incoming copper braid. I made some small coils from 32 gauge fine silver wire I had. I inserted both ends of the broken wire into the coil and crimped it down to make solid contact. I did the same to the other break. I now had good continuity. This solution on its own would never last, so I bought some silver conductive epoxy and coated the repairs I had just made. Once the epoxy hardened I tested the continuity and checked that the impedance was the same as the other driver. After cleaning the cone and repairing the small tear using Aileen’s glue, I put it back together. Careful listening has determined this to be the best driver of the three with the other repaired driver coming in last. I will use the two best drivers and probably keep the third as a spare.
The F-28 crossover, or filter as the BBC called it, is in excellent shape. I measured all the component parts and they each came within 2% of the schematic values. The crossovers are truly built like a tank.
By 1958 the better quality speakers available to the public allowed the above average audiophile, with a set of Tannoy’s, Quads, Goodmans and some others, to hear something in the broadcast that the engineers at the BBC couldn’t. The LS-1 has limited high frequency response which made it impossible to hear a whistle generated by the 405 line TV signal. To correct this all the LSU/10’s were converted to three-ways with the addition of Lorenz LPH-65 “clear foil” poly coned super tweeters. The crossover for the LPH-65 used TCC and Hunts capacitors which had all become leaky and unusable. I kept the original inductor and added some vintage paper in oil capacitors to rebuild them. The LPH-65’s add a sparkle and depth that is sorely missed when they are not in the system.
After waiting two weeks for the paint to cure to the point where I could re apply it I decided to try the spray can version of the Hammerite. This made things go from bad to worse. It was as if I had sprayed a hazy film over the cabinets. No, that was not the look I wanted.

I don’t have the facilities to spray a proper finish so I revisited the roller idea. My brother suggested using a 24” wide professional roller. This is my next step as I wait the two weeks cure time. The good news is they play as I type and in twenty years of being in this hobby I have never heard their equal.
I took a chance on an educated hunch and it really paid off. The whole thing could have just as easily gone horribly wrong. Did I mention my wife loves these ugly things? I would like to thank the publisher; he is taking quite a chance by letting an amateur try to tell what I hope is an interesting story.
Associated gear:
- DIY 300b SET monoblock amplifiers based on the Consonance Billie’s,
- DIY passive control center with Silver S&B TX-102 Transformer volume control,
- extensively modified Sony SACD Player,
- Pioneer RT-707 reel to reel.
from affordableaudio, By Tom Goulet
I was in the London BH Control Room (1961/62)when I was taking the BBC TO 15 course at Wood Norton . I remember us using two of these LSU/10’s after midnight when all of the network TV had shut down and tests were being carried out with Stereo using the Zenith GE system.
One channel was BBC TV sound the other channel was BBC radio.
We added a Lorenz LPH 65 tweeter ,mounted in the centre behind the expanded metal grill.
If you are interested I have two of these tweeters .Both are working but one has one lug missing & a slight dent in the magnet ,plastic voice coil dome. It does not affect the sound. The other one is perfect.
I will be listing them on EBay soon.
Regards Brian Wright.
As a member of BBC staff and a collector of BBC equipment dating back to the 1920’s, I have to correct you on what you say about Hammerite (or hammered finish) paint. This hammered finish is not what is generally known as BBC Dove Grey, most BBC equipment was painted in a smooth grey paint with either a gloss or satin (silk) finish. The hammered paint was used only on some later loudspeakers as standard. Speakers such as the LS3/1 and the LS5/1, but never on the LSU/10. These speakers were either in a plain wood finish or sometimes painted in a satin black paint. Some were later re finished in BBC Dove Grey, particularly ones in TV Studios where they were used as foldback speakers. I hope this information is useful to someone. best wishes, Chris
ps I have three LSU/10 speakers complete with original amplifiers in my collection, and they sound just amazing…