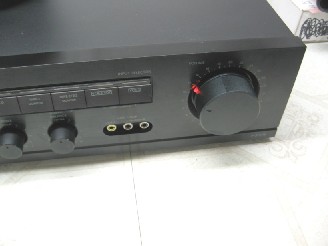
I had just received an Onkyo P-3150V preamp I purchased for my older son’s stereo system. It arrived with a misshapen case, the chassis would not sit square on the table, and the volume knob was broken. Also, the bezel around the volume knob was knocked in. There was a silvery ding in the black anodized finish on one corner of the faceplate.
I disassembled the unit. The chassis was a little tweaked, but I was able to tweak it back so it would sit flat. I removed the dent near the back left corner by turning the top upside down on my workbench, placing a wood block and struck it a few times with my 3 lb shop hammer. Dent fixed. The right front corner of the top was also a little misshapen, but by positioning it carefully using my bench vise as an anvil, I was able to tap the corner back in shape. A little glass cleaner squirted on, and wiping with a soft cloth had the top looking pretty good. And it fit back on the chassis well, too.
Next, I removed the knobs, then the faceplate. It turns out that the various holes in the faceplate have plastic bezels held in from the backside by what looks like strips of double sided tape. I glued the loose bezel back with E6000 glue (THAT’s the kind of thing I keep this glue for), and while I was already there, I added glue around all the other bezels on the faceplate. That will prevent that problem from happening again.
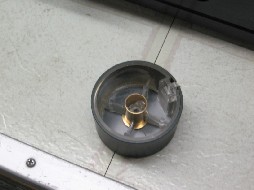
Now that the faceplate and knobs are off, it is a good time to give them a good cleaning, getting into the nooks and crannies. I used glass cleaner and a soft cloth. But let’s look at that broken volume knob.
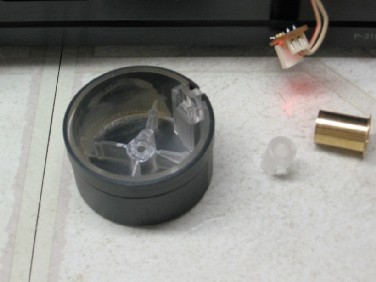
So, what we need is to not only glue the broken socket back, but to reinforce it so that it won’t break again under normal use. I obtained a little brass ferrule, or insert, from my favorite hardware store’s plumbing section. I think this type of ferrule is inserted into plastic tubing to keep it from collapsing at connections. It was just the right size, 5/8″ diameter, just a little larger than the plastic socket.
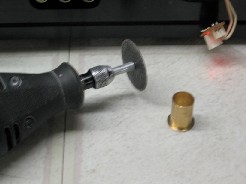
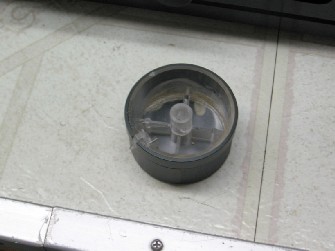
I used a fiber cutoff wheel with my Dremel Tool (R) to cut four slots in the ferrule such that it would fit into the knob and slip down around the four reinforcing webs in the knob. MAKE SURE YOU WEAR SAFETY GLASSES WHEN YOU DO THIS.
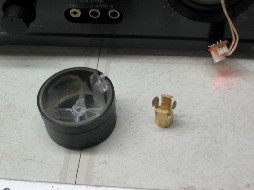
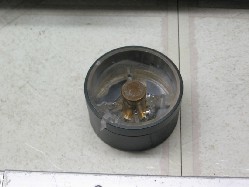
Next, I glued the broken stub back to the knob using a little gel type CA glue. BE VERY CAREFUL to not get this on your fingers, then on the knob and faceplate. As you know, superglue will leave white fingerprints. The idea here is just to get the broken piece glued back as it came off, and well fitted so that it is back in line.
I was tempted to use my old favorite, E6000, but that glue would have been confined against the plastic, and the solvents would not easily dry possibly damaging the plastic before it completely dried. Instead, I mixed up some 5 minute epoxy. I smeared it around the socket inside the knob, around the reinforcing webs.
Then I smeared some epoxy inside the brass ferrule so that when the ferrule was slid down into the knob there would be no voids between the brass ferrule and the plastic socket. While the epoxy was still liquid I dabbed more around the base of the ferrule and the reinforcing webs. Be careful to not let epoxy get inside the socket.
If the socket is merely split, as often happens, use a little CA glue, force it back together, and then continue as I have done here.
Then I reinstalled the LED light assembly (for the pointer) making sure that the solder joints on the back of the board did not short against the brass ferrule. The leads stuck out quite far, so I used a grinding tip with the Dremel Tool (R) to get a little more clearance there.

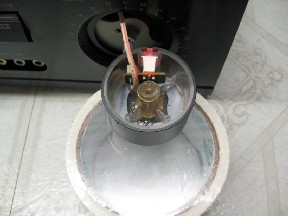
After the epoxy has had time to harden I would wait 30 minutes for 5 minute epoxy (5 Minute refers to “working time”, not hardening time) it is
time to install the knob. I turned the stem of the volume control potentiometer all the way counterclockwise, or off. Then, aligning the pointer with zero, I pressed it on. It felt like pressing on a new knob. Success!!!There, doesn’t that look better? Until next time, enjoy.